Shaped Handmade Paper! How to Make a Custom Deckle

One reason people choose to make paper by hand is the ability to customize your paper for each project. You may have already considered shifting variables like color, weight, texture, and size, but you can also change the shape of your paper. Think outside of the traditional rectangular deckle with your own, handmade shaped deckle. Using just some foam core and a bit of tape, you’ll be able to explore new possibilities in your work with your own custom deckle. Not only can you creature uniquely shaped sheets of paper with your existing mould and a new custom deckle, but you can even make multiple sheets of paper with a single vat pull! Click through to learn more.
SUPPLIES:
· foam core or corrugated plastic
· clear shipping/packaging tape· x-acto knife
· self-healing mat or other cutting surface
· basic papermaking set up (mould & deckle, pulp, vat, felts)
· optional: bone folder
custom shape hand papermaking deckles
Step 1: Design
Creating a shaped deckle is similar to creating a stencil for your desired paper shape. When deciding on your shape, it's best to design it the same way you might a stencil (graphic, solid shapes). The pulp will fill the negative spaces and form your sheet.As with all techniques in hand papermaking, there’s always plenty of room for exploration and experimentation.
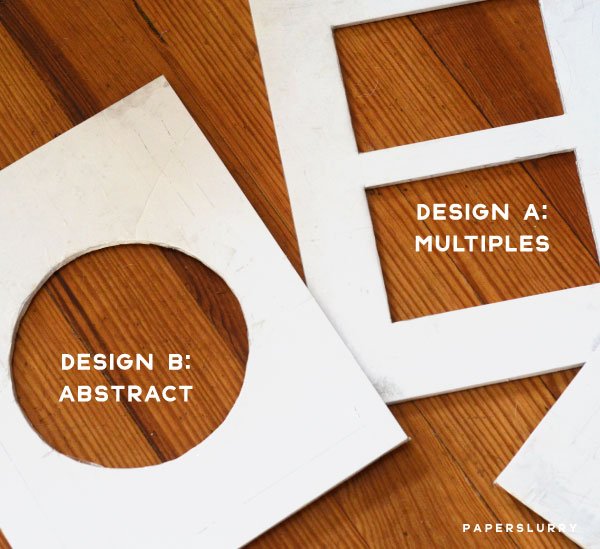
Design A: Deckle for multiple sheets in a single pull - This deckle has been designed to produce (2) 4 x 6 sheets of paper with each pull from the vat. These sheets would be great for postcard or stationery use!
Design B: Abstract Shapes (circle) - The method used in Design A could be applied to this type of deckle as well.


To design your template, trace the traditional deckle that corresponds to the mould you will be using for this project. Trace both the perimeter of the rectangle and along the inside of the rectangle, so that you end up with a center form that aligns with the mesh of your mould. Within that inner space, center and trace the form you’ve chosen for your deckle shape with a ½ “ to 1” margin. When working with multiple sheets, like in the postcard deckle, make sure to leave at least a 1” space between the two forms to ensure the integrity of your deckle and forms.
Step 2: Cut

Using your box cutter and/or x-acto knife, begin to score/cut along the perimeter of your shape. You will only need to cut out the space where you will want the pulp to form into a sheet, the other markings on your deckle are just guidelines for your design. Foam core/corrugated plastic are a bit difficult to work with, so work slowly for both your own safety and the accuracy of your design.
Although the overall shape of your paper will be different, it will still have the soft edge inherent to handmade paper. The general outline of your shape should be fine (don’t worry too much about small miscuts, they’ll likely go unnoticed). Any tears or fuzz along the edges of your cut can be burnished off using a bone folder.
Step 3: Waterproof

If working with corrugated plastic, you will only need to tape along the open edges/sides of your deckle to prevent water/pulp from entering the open corrugations. If using foam core, you will need to waterproof the entire deckle.Using long strips of packing tape, begin to cover your deckle with clear packing tape (both front/back). It is best to keep the pieces of the tape minimally layered to create a smooth surface. Use either a bone folder or credit card to smooth the tape and remove air bubbles.
Step 4: Make paper

Now you’re ready to start making your custom sheets of paper.
Set up your vat and align your custom deckle with the edges of your mould. Dip your deckle and mould into the vat, making sure to gather enough pulp to fill your custom spaces. Unlike traditional papermaking, the goal is not to cover the entire surface. You only want to collect pulp in the spaces with exposed mesh. If fiber collects on the opaque surface of the deckle, you can either put it back into the vat after your sheet has drained by removing gently with your hands or tweezers. Remove the deckle once adequately drained and couch onto your pellons or felts. You’ll also want to give your custom deckle a quick rinse (or dip in water) between each pull, to ensure your vat doesn’t become contaminated with dry fiber bits.
As you build your post, it’s important to be aware of the location of the sheets in the lower section of the post. It’s best to have all of the sheets roughly aligned in the most for pressing. Shaped deckles can be used to make shaped paper for stationery, printmaking, and other fine artworks.
When paper expands beyond the rectangular conventions, it can become a representative object itself, too. Here, the raw edge of the paper highlights the conceptual underpinnings of the work. You can also improve the efficiency of editioning handmade paper using a custom deckle. Zoe Sheehan Saldana and Lisa Switalski use a customized deckle to create multiples for a Dieu Donne benefit auction. Click here watch four sheets of paper made in a single pull!